International Seed Shipping Update
Learn how to start your seeds
Home Blog Growing with Landscape Fabric
April 4th 2019

Growing with Landscape Fabric

Written by
Floret

The first year I grew flowers, my cutting garden was a delightful jungle of flowers and waist-high weeds. While I loved the process of selecting varieties, planting, tending, and picking, I hadn’t anticipated just how much energy would be used battling weeds to ensure a healthy and abundant harvest.

The following spring, determined to have a more successful experience, I borrowed $1,000 from my mom and ordered enough landscape fabric to cover my barely half-acre plot.

Floret_Landscape Fabric-15It was a huge investment, but it was the only way I could see being able to manage the weeds, wrangle our two small children, and grow my budding little business. That spring, Chris burned close to 15,000 holes in landscape fabric, and I finally had a thriving and relatively weed-free garden.

A lot has changed since then. Both the kids and the garden grew rapidly, but that initial batch of landscape fabric is still in use and has been added to each season.

Floret_Landscape Fabric-6
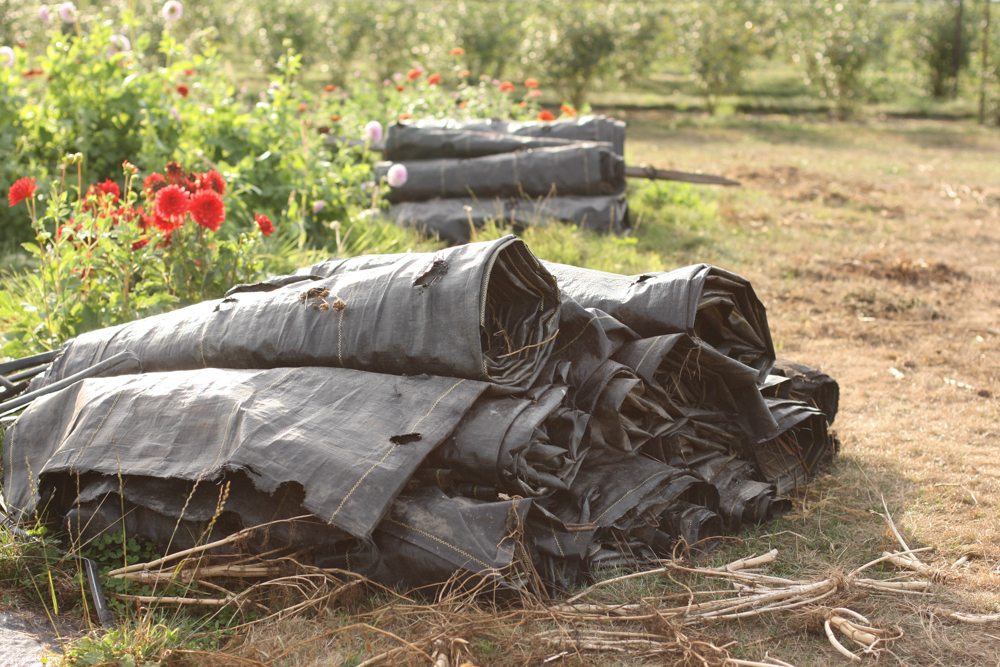
While weed suppression is our main reason for using landscape fabric, there are a few additional benefits worth noting. Unlike plastic, landscape fabric is reusable. The majority of our stock is more than 10 years old and shows little to no wear.

I also inherited a batch of preburned fabric from a retired flower farmer that dates back to the early ’90s and is still in pretty good shape, considering its age. I am hopeful that ours will last for 20-plus years too.

Floret_Landscape Fabric-19
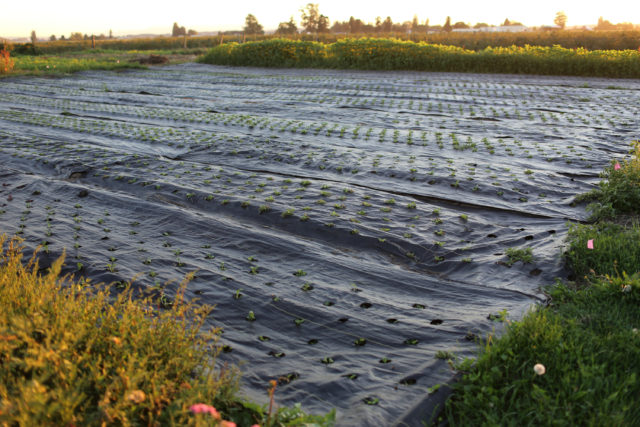
Flowers like basil, celosia, cosmos, and zinnias, which like warmer soil and added heat, thrive when planted into the fabric. And moisture retention seems to be greatly increased too. Another great bonus is that fabric makes for a tidy, clean-looking garden. Proper plant spacing is a snap when the holes are preburned.

Floret_Landscape Fabric-23
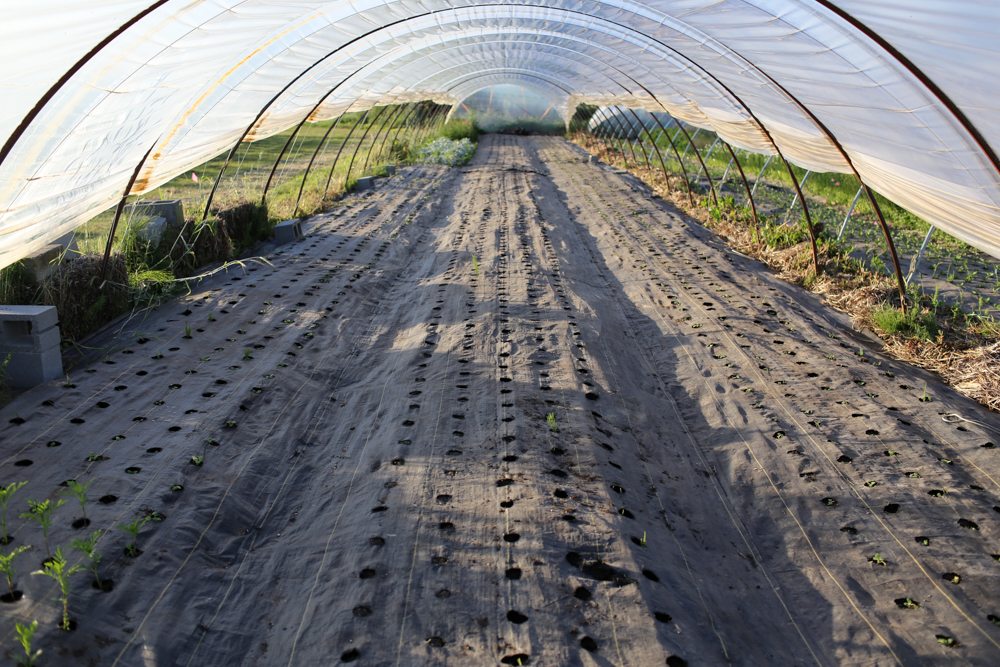
Last, weed pressure is greatly decreased. We generally only have to do two early rounds of weeding on the fabric beds before they can coast for the rest of the season untended. Compared to the time spent on the typical four or five rounds of weeding needed on our open-field crops, the cost of the fabric quickly pays for itself in saved labor.

Floret_Landscape Fabric-18Sunbelt is the brand of landscape fabric we always buy, and if you can’t find it locally, you can find it at Johnny’s Selected Seeds. It is shiny on both sides (avoid the type with a fuzzy bottom), is super durable, and comes in a number of different lengths and widths.

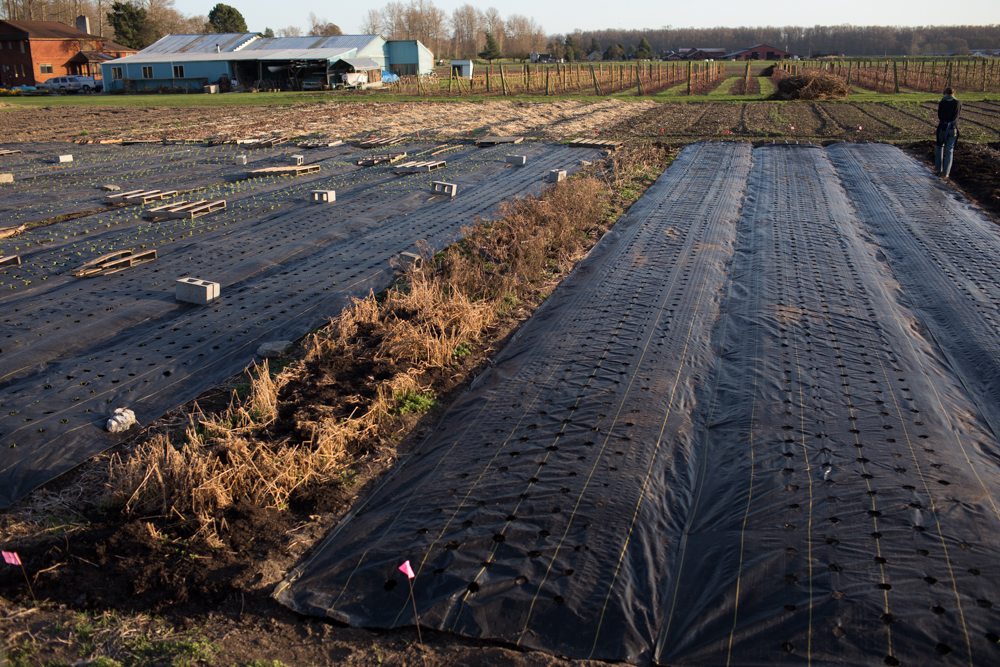
We prefer the 6-ft-wide by 300-ft-long (1.8-m-wide by 91-m-long) rolls, which allow 4 ft (1.2 m) for the growing bed and, if overlapped with another swath of fabric, provide a weed-free path between beds that’s just wide enough for planting, weeding, and harvesting.

Floret_Landscape Fabric-33
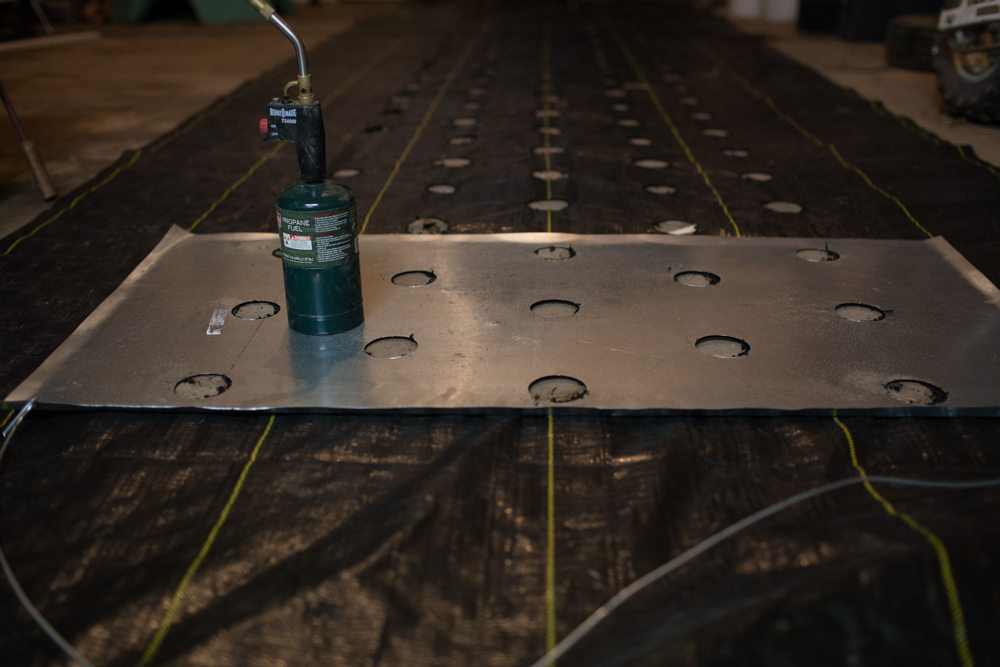
It’s important that the holes in the landscape fabric are burned, not cut. We highly recommend using a handheld Bernzomatic TS4000 Trigger Start Torch attachment, which screws onto a 14-ounce disposable propane canister, available at your local hardware store. One canister will last a long time, and the automatic trigger switch, while more expensive than the flint-lit version, will pay for itself in no time.

For perfect spacing and increased efficiency, you will need to use some type of template. In the early years I made them out of cardboard and lined the holes with tinfoil. They worked pretty well for a short while, but didn’t hold up over the long haul.

I have friends who make templates out of plywood, but I’d recommend staying away from this option since plywood gets really heavy to pull along, especially if you have a lot of fabric to burn.

The best option is to use a template made of metal. You can make your own with supplies from the hardware store, including a 2-in (5-cm) hole drill and sheet metal. It’s a bit of a project, but metal is the lightest and longest-lasting option.

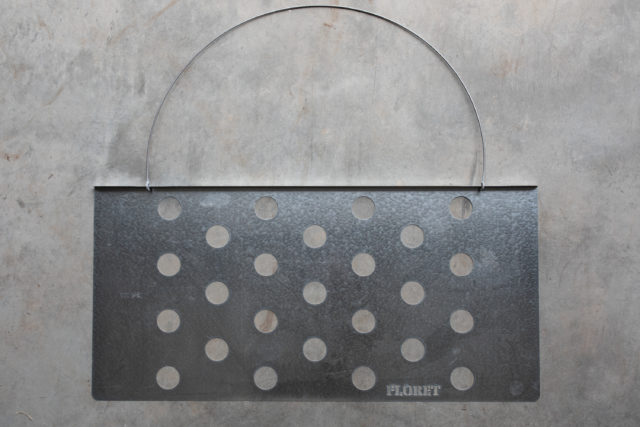
Using a template is a total game changer when it comes to using landscape fabric because it allows you to perfectly space each hole quickly and efficiently, saving you so many hours of work.

Here on the farm, we use six main spacing regimes. You can learn more about our approach to intensive growing, including more about spacing, in my post How to Grow More Flowers Than You Ever Thought Possible.

6- by 6-in (15-cm) spacing = 7 rows per bed. This tight spacing is great for single-stemmed crops like ‘Bombay’ celosia, flowering kale, and lisianthus.

9- by 9-in (23-cm) spacing = 5 rows per bed. This is by far our most popular spacing, making up about 80 percent of our field, and is perfect for ageratum, basil, bupleurum, dianthus, frosted explosion grass, honeywort, snapdragons, and zinnias.

12- by 12-in (30-cm) spacing = 4 rows per bed. This spacing is perfect for bulky varieties like amaranth, bells of Ireland, celosia, lavatera, perilla, and scented geranium.

18- by 18-in (46-cm) spacing = 3 rows per bed. This spacing works for really large plants like branching sunflowers and eucalyptus.

Vine spacing: 8 in (20 cm) between plants and 12 in (30 cm) between rows = 2 rows per bed, one on each side of the trellis. This spacing is perfect for hyacinth bean, love-in-a-puff, nasturtium, and sweet peas.

Dahlia spacing: 12 in (30 cm) between plants and 18 in (46 cm) between rows = 2 rows per bed. We grow our dahlias intensively because we are harvesting from them regularly and providing plenty of support.

Floret_Landscape Fabric-34In past years we’ve burned the fabric outdoors, because the fumes are pretty strong, but in the spring, when wind-free days are scarce, we sometimes have to move the project inside. Our garage has a large concrete floor and plenty of big doors that can be rolled open for good ventilation.

With music playing and someone to help move the template, we are able to burn a 300-ft (91-m) roll of fabric in about an hour and a half.

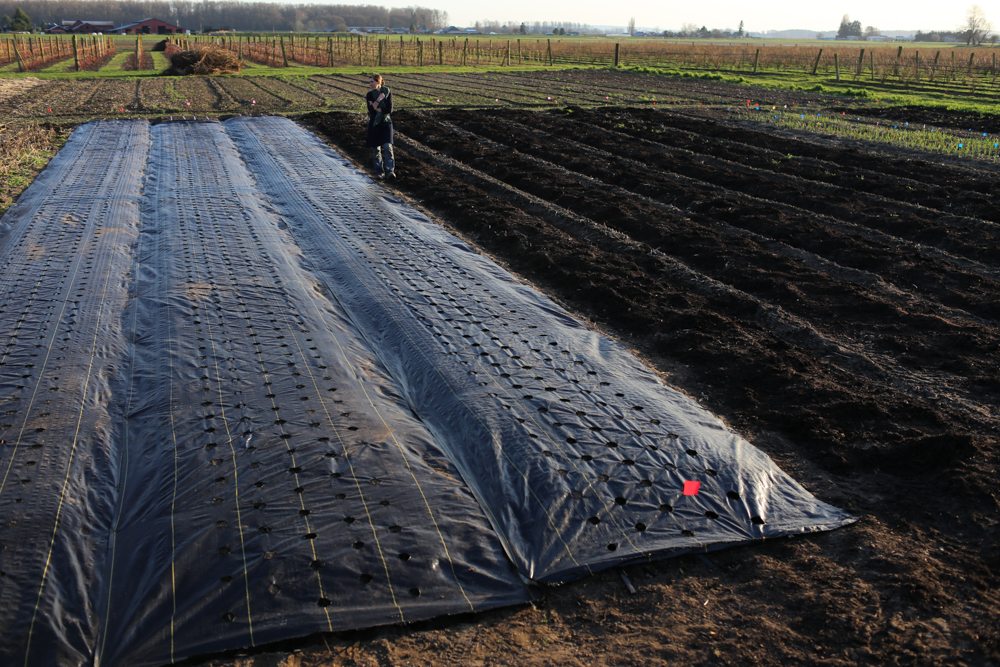
Before laying the fabric, we amend beds with compost and fertilizer, then lightly till and lay four lines of drip irrigation. You can get the full scoop about how we prepare planting beds in my post about Soil Preparation.

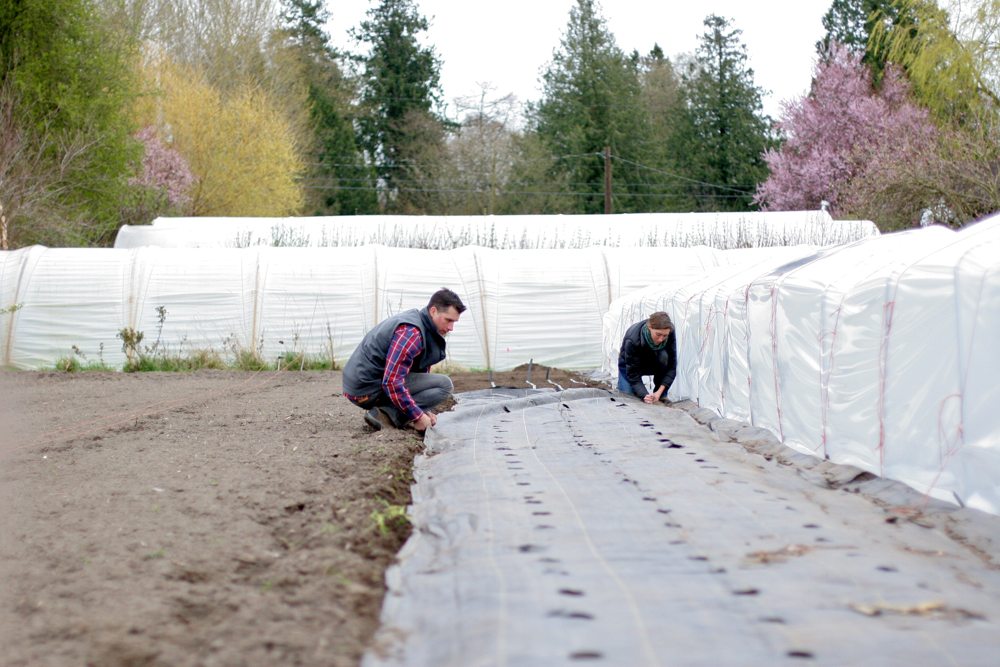
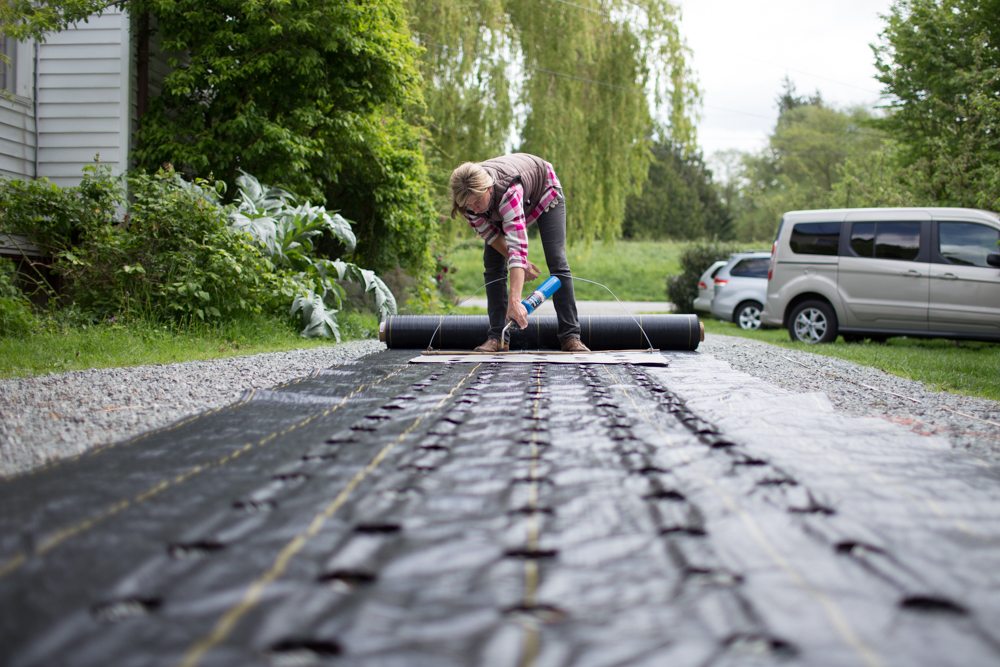
After the soil has been amended and drip irrigation is in place, we roll the fabric out over the beds and irrigation lines and anchor it in place with earth staples.

During the earliest months of spring, we get a lot of intense windstorms (gusts of up to 40 to 60 mph [64 to 97 kph]) that roll through our valley. To keep newly laid fabric in place during really breezy weather, we place cinder blocks along the pathways. Once the weather has calmed, we take them up and store them.

Floret_Landscape Fabric-5
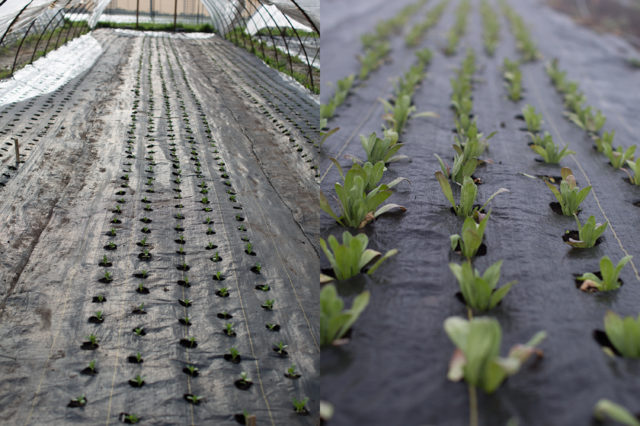
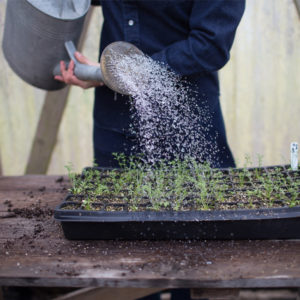
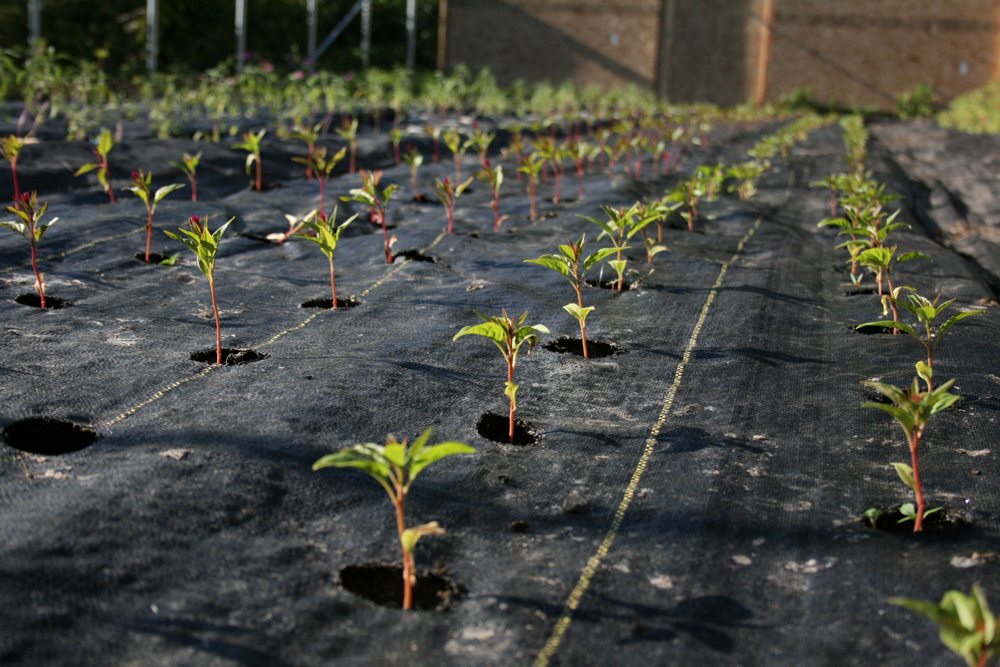
Seedlings are tucked into the preburned holes with our favorite planting tool, a butter knife. Nothing does the job better! Newly planted babies are given a light overhead watering and a long drip irrigation soaking, then left to do their thing.

We come through a few times with compost tea and, as the plants grow, add a layer or two of Hortonova flower netting for support.

Floret_Landscape Fabric-4
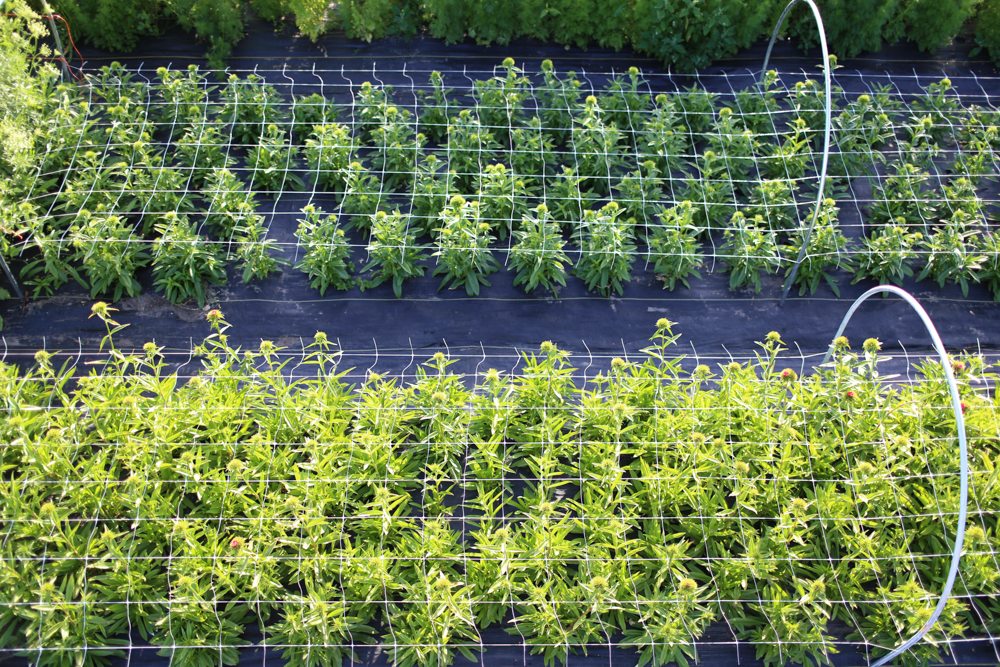
After the crop has been harvested, we remove the netting and mow the remaining foliage down with either our brush hog, set 1 ft (30 cm) above the ground, or a weed whacker/string trimmer.

We then chain the ends of the fabric to our tractor bucket and pull it up. Before we had a tractor, it was all done by hand. After the fabric is removed, we shake off the excess dirt, fold it up, and store it away for the next season.

Floret_Landscape Fabric-13While using landscape fabric is certainly more labor-intensive on the front and back ends of the season compared with straight field planting, we’ve found that the added weed suppression and perfect preset plant spacing far outweigh the drawbacks.


Please note: If your comment doesn’t show up right away, sit tight; we have a spam filter that requires us to approve comments before they are published.

177 Comments

  1. Stefanie Richter on

    This post is so helpful. Question regarding the metal template picture you posted. Is that 4 feet by 2? Trying to figure out what the dimensions are and how many inches apart each hole is on the one you posted. Thank you!

    Reply
    • BriAnn, Team Floret on

      Yes, it’s 4 feet by 2 feet and the holes can be spaced however you want, but we typically use 9 inch spacing for many of our plants. About halfway down the post you’ll find plant spacing suggestions.

  2. Bernadette on

    Would a torch weed burner be the same thing as what you suggest for making holes? Or would the flame be too large you think?

    Reply
    • BriAnn, Team Floret on

      You could try it and see how well it works, but we use a smaller torch in combination with the metal template to get consistent hole sizes and spacing.

  3. Robin Thompson on

    Would it be possible to get the actual measurements for your templates you indicate. I am working on creating mine and while I can do a multitude of things, apparently calculating the proper measurements for these kinds of template are totally stumping me. I am particularly interested in the 9 X 9, 12X 12 and 18 X 18 sets. I have been reading your blog with great interest. Thank you

    Reply
    • BriAnn, Team Floret on

      Our templates are 4 feet wide by 2 feet long. The number of rows per hole spacing can be found halfway down the article. We use a 2 inch hole drill. I hope this helps!

  4. Tiena on

    So I’m a novice and am planting in 6×12 raised beds this year with hopes to plant an acre or two next year. Regarding the template for fabric cutting – I’m guessing you have different templates for different spacing. My son’s a fabricator and could easily make for me, just want to make sure I understand the spacing of the one you pictured.
    Thanks – Tiena

    Reply
  5. Heidi Kate on

    Hello there. I’m unable to find your template for burning holes.

    Thank you kindly

    Reply
    • BriAnn, Team Floret on

      We don’t sell them but encourage people to make a template at home using a sheet of metal (or plywood) and a 2 inch hole drill.

  6. Lisa on

    I grew perennial carnations, geums, yarrow by starts last year. Left in ground all winter and most have filled holes completely in weed barrier. I did not remove weed barrier in winter. Thinking perennials under weed barrier was not best idea as they will have to be devided at some point and be over crowded under weed barrier. Your thoughts? Do you grow any perennials this way?

    Reply
  7. Amy on

    Is it possible to grow flowers with landscape cloth and not run irrigation? Can you water from above successfully?

    Reply
    • BriAnn, Team Floret on

      The landscape fabric would make overhead watering more challenging especially as the plants get bigger and cover the holes.

  8. Annie on

    Can irrigation run on top of the fabric? The online description says water can penetrate but I’m worried it won’t. On the other hand, I vi want to be able to see the drip lines to be able to spot a blowout or blockage. Have you or do you know anyone who has successfully run the irrigation on top of the fabric?

    Reply
  9. Ashley Troxell on

    I have tried to wrap my brain around how to make the templates. Do you have detailed measurements for the templates? Do you still sell them?

    Reply
    • BriAnn, Team Floret on

      We don’t sell them but we share a helpful video tutorial within our Online Workshop. The holes are typically 2.5″ in diameter and the spacing details are in this article depending on what you plant into them.

  10. Nana Akua on

    I’m planting peppers , onions and cabbage what hole sizes do I need to create in my weed control mat

    Reply
    • BriAnn, Team Floret on

      We haven’t grown veggies in landscape fabric holes but if you know the size of the stock they’ll produce then just be sure the holes are a little bigger.

  11. Theresa on

    I have areas of thick weeds. I would like to use the areas for gardening but the weeds keep coming. could I somehow apply landscape fabric now and leave it throughout the fall and winter months? would the fabric permantly kill the weeds so in the spring I could garden in these areas (I don’t want to use chemical weed killer solutions)? Any advice welcomed.

    Theresa

    Reply
    • BriAnn, Team Floret on

      You could lay the fabric down in the fall and winter to suppress the weeds and in spring prepare the soil for planting.

  12. Kate on

    I put my drip irrigation on top of the landscape fabric, because other articles I read said to do so. My fabric is already planted. Will it still be effective or will I need to remove it all?

    Reply
  13. Laurie Gehrt on

    Erin, when you attach a chain to the end of a row of fabric, are you just wrapping the chain around a bunch portion of the end and pulling it then? I had to do that when we were putting down some artificial turf by our pool and wondered if it was the same concept.

    Reply
  14. Michelle D Roe on

    When you made you holes What spacing did you use for Zinnias cosmos straw flower. Every one spacing is different.
    Thanks Michelle

    Reply
  15. Jane on

    Do you make your compost tea? Or buy it? If you make it, do you have a recipe? 😊

    Thanks!!!

    Reply
  16. Ronni on

    Oh nooo the fabric I bought has the fuzzy bottom. Should I return it?

    Reply
  17. Dena on

    Using the landscape fabric what is the hole size for Dahlias? I understand the 12” spacing.

    Reply
    • BriAnn, Team Floret on

      We’ve found that mulching dahlias works great and it’s easier to dig up the tubers at the end of the season than growing them in landscape fabric.

  18. Ginny on

    Great post, thank you for sharing. We are just getting started after moving from 1/3 acre in Delaware to 97 acres in NW Georgia. I did make a template in plywood but I tried burning the holes after the fabric was laid out. Because there are air pockets the flame went beyond the 3″ hole in the template so we tossed that idea since our fabric is already down. Then I tried a creme brulee torch and it worked great! Perfect holes, no template. We are in a test year just to see what we can grow so we don’t have thousands of holes to burn like you do but I thought I’d mention this method for anyone looking to do this in a smaller garden.

    Reply
  19. Marie on

    Is it necessary to use drip irrigation or soaker hoses under the landscape fabric, or can I simply water the rows daily?

    Reply
  20. Chelsea on

    Would Cosmos, Pincushions and Bachelor Buttons all be planted at 9×9 spacing?

    Reply
    • BriAnn, Team Floret on

      For those varieties we space them at 12 inches. Recommended spacing requirements can be found on the seed packets and also on the description pages in our online shop.

    • BriAnn, Team Floret on

      We don’t, but they’re fairly simple and easy to make.

  21. Kimberly Smith on

    So thankful to have watched your show and to have learned about you guys! We just recently purchased a new house on 10 acres and trying to learn how to cut down on the weeds to begin planting flowers next year. I just wanted to thank you for posting all of helpful articles you’ve written. Everyone of them has been so knowledgeable and big help. Can’t wait to register for your workshop this year and looking forward to purchasing seeds!!

    Reply
  22. Lana on

    Thanks for this! If you do use landscape fabric like this, do you have to use drip irrigation as well, or can you still hand water or use sprinklers?

    Reply
  23. Patty Munro on

    The template is 5 rows? It looks like 7 rows across? The metal template photo above.
    Thanks!

    Reply
  24. Patty Munro on

    Hi again! Another question about the template. The one above has 25 moles. Is that the template for 4 rows with 12×12 spacing?

    Reply
    • BriAnn Boots on

      9 x 9 inch spacing with 5 rows.

  25. Patty Munro on

    My husband is going to make me a template like yours with the metal. How big are your holes? Thanks!

    Reply
  26. Charlotte Adams on

    Can you plant seeds on top of landscape fabric? Will the roots grow down through the fabric?

    Reply
    • BriAnn Boots on

      The roots won’t be able to grow through the fabric, so burning holes into the fabric creates space for the plants to grow in the soil while keeping the weeds down around them.

  27. Mary Lauer on

    I read that Sweet Rocket is invasive. How do you deal with that? Also can I put drip irrigation on top of the fabric instead of under?

    Reply
  28. Johnny Johnson on

    Do you plant Dahlias under landscape fabric ?

    We have a bedmaker with 360 biodegradable plastic.

    Have you ever tried that ?

    Reply
  29. Melanie Corey on

    Hi, for your garden plots, what size and where do you get your small hoops to hold up your flower support netting?

    Reply
  30. Asher on

    Excellent post.
    I completely agree that ‘landscape fabric’ creates many problems and solves none. Wise gardeners avoid it. Less wise ones, me included, have to learn the hard way, but then never waste money and time on it again.
    Click here to read more https://plantswhisper.co.uk/best-weed-membranes/

    Reply
  31. Lauren DeSisso on

    Hi I’m starting a small flower farm with one acre this next season and seeing if I can handle more the next. I’ve registered for your October class or am on the waiting list rather but I have a quick question about landscape fabric. It’s very expensive and we’ve found a product that is. Offer called silage tarp. Would you recommend against this or do you have an opinion? Thank you for your help!

    Reply
  32. Giovanna on

    Would the landscape fabric be a bad idea in hot weather? We easily reach 100F or more here (east bay, CA, inland). Would some vegetables struggle to cope with the heat caused by the fabric? Thanks!

    Reply
  33. Andi Smith on

    Hi! I love your books and have been following you for a while. I am excited to start my own small backyard garden in our new house! Right now we are building two 4’x10′ raised garden beds. (I live in Texas and the soil isn’t the best. Talk about foundation issues when we were house hunting!) I am starting late in the season so I ordered some heat-loving seeds. My question is, have you ever experimented with fabric on the ground and then build a bed on top of that? Filling it with soil etc. We were trying to come up with a way to avoid pulling tons of weeds and grass.

    Secondly, I am trying to figure out some more shade-loving flowers and shrubs for the front landscaping. This is an area I wouldn’t necessarily be cutting as much as the flower beds. Do you have any suggestions or resources? I am getting a bit overwhelmed! I’ve even thought about planting a flowering tree in the front and one in the back by our master bedrooms windows like a crabapple or plum, but I need to slow my roll. Haha!

    Thank you so much for taking the time and effort to share your story and experiences with the rest of us!

    Reply
  34. Dr.Jared Nyman on

    Can you please tell me what the brand name is of the drip line you use?

    Reply
  35. Cathy Stansbury on

    Do you use landscape fabric with your perennials? If so, do you take them up at the end of the season?

    Reply
  36. Avery Rech on

    I will be making my template soon for burning the holes. My question is what is the diameter of the holes? I see you purchased a 2″ hole drill attachment. Will be growing mostly stock, few chocolate flower, and other hardy annuals. Thank you!

    Reply
  37. Kim @ Otis Blooms on

    I’m jumping into the flower adventure in Easter Washington with a ton of help from Florets amazing resources….

    One question I’m struggling with is What flowers SHOULD NOT be grown with landscape fabric??

    Could someone please help?

    Many thanks!

    Reply
  38. Marilee on

    Great tip about landscape fabric,total game changer.
    Growing up in N.Calif., I enjoyed my sisters Organic produce farm for 30 years,it definitely is a
    Labor of love and your passion is what drives you.Seeing you out in the field brings back many
    Fond memories.I wish you lots of success,LOVE your Floret flowers!

    Reply
  39. Amelia on

    Why do you say to stay away from fuzzy bottomed fabric? I have always used sunbelt but have a large amount of fuzzy bottom fabric I was given for free and I would like to put it to use, but want to make sure I am not setting myself up for some issues down the line. Thanks!

    Reply
  40. Amelia on

    I believe I read that they started growing their dahlias in fabric but then stopped, as it was too hot for them. I am not sure if I read that online or in their book though. On the farm I manage we have no till and tilled areas, and when we no-till an area and do not use fabric mulch we thoroughly burn the bed with our pyroweeder, then lay down a heavy lot of compost (at least 3″) this works pretty well to manage weeds.

    Reply
  41. Vanessa on

    How do you control rodents? Every year I grow with fabric mulch and the fight gets worse. They take out young plant stems and roots. Fabric gives them cover from the predators. Traps and bait have done nothing so far. Just wondering if I have some really infested land or if this a problem elsewhere.
    Thanks.
    Vanessa

    Reply
  42. Dina on

    Hi,

    We just bought a home with a backyard big enough for our very own cutting garden and I’m itching to get started on growing dahlia’s the “Floret way”. But, I don’t quite understand the spacing for the landscape fabric. (Dahlia spacing, 12″ between plants and 18″ between rows = 2 rows per bed. We grow our dahlias intensively, with 2 rows per bed.)

    I have the reference guide from the mini online 4 part course. I don’t see any mention of landscape fabric. In fact it suggests planting dahlia tubers and using mulch. Which do you think is best for dahlias?

    I’m very new to flower growing and I’m sorry if this is a silly question. But, I am actually really curious and want to learn more. Obsessed with this site and all the good information I am soaking up as I read and re-read the same thing night after night!

    Reply
  43. Deby on

    Hi Erin,
    Thanks for the helpful article. We’ve done all you said and it’s worked well for us. Question–you said you use the tractor bucket to pull up the fabric at the end of the season, do you pull the staples out with it, do they come out attached to the fabric or do you have to go through by hand? Sometimes our staples don’t come out with the fabric which makes it a manual process to pull the staples out with a crowbar from our sticky clay soil. Advice? Thanks.

    Reply
  44. Cate Crawford on

    Once installed, can the fabric be left to overwinter?

    I ask because I would worry about leaving soil exposed over the winter.

    Or do you plant a cover crop and then till it in at the beginning of the next season?

    Love this post!

    Reply
    • Team Floret on

      Hi Cate,

      We remove the fabric and plant a cover crop. Hope this helps!

  45. Pam on

    Could you tell me how much one of these templates weighs? Or the gauge of the Steel? Thank you, Pam

    Reply
  46. Francois on

    Hi! Can anyone please help answer a question I have regarding drip line emitter spacing? I have laid out my beds exactly as suggested by Erin and others – 1.2m wide with different plant spacing for different crops and constructed a template for burning holes into ground cover fabric. Most beds are 23cm spacing and a few are 15cm and 30cm. I only made use of 30cm drip emitter spacing on all the beds. There are 4 driplines evenly spaced on each bed and they are covered with the ground cover. My question is whether this 30cm emitter spacing will be a problem for those crops that are not 30cm apart? (I have sandy to loamy soil and drip rate is 1L/hour from each emitter). From what I have read it shouldn’t be too much of a problem but since there aren’t any guidelines here on emitter spacing, I was hoping some of you could let me know what you have done? Thanks so much!

    Reply
  47. Mary on

    Hi,
    Looking at the templates 6×6, 9×9 and 12×12″ they seem to have the same size circles, is that right?
    How about the others?

    Reply
    • Team Floret on

      Hi Mary,

      Yes, the circle size is all the same.

  48. Aaron on

    I cant say enough about your site, I absolutely LOVE all the articles you write!

    Reply
  49. Mike Kennedy on

    Would it be possible for your team to make a short video to show the actual “burning technique”?

    Thanks

    Reply
  50. Jessica George on

    Do you use fabric for bulbs as well? I’m thinking of planting some, but I’m planting in the fall and I worry about their growth and spread overtime? Should I not use fabric?

    Reply
    • Team Floret on

      Hi Jessica– no, we do not use fabric with bulbs. Have a great season!

  51. Drew Snyder on

    How are the plastics stored? Folded or rolled up on something like conduit or PVC?

    Also, you said you chain them up to tractor to pull out — what tools/attachments do you use.

    Thanks!

    Reply
  52. Meagan Crawford on

    I have major weeds and grass growing through the holes. How do you weed 10,000 holes?? And not pull the seedlings too? Preventative? Preen or something?

    Reply
  53. Faye Doyle on

    I have your book and love it!! It has inspired me so much and I have it close by always!
    Thankyou for your time and effort in teaching others.
    Can you tell me if it is to late to plant Lisisanthus and Larkspur in my zone 6 ?
    Also I have Cheif series celosia in plug trays that have already started to bloom. Can I cut them way back and still plant them out? We planted so many varieties you recommended and hope to one day come to your farm.
    Thanks So much,
    Faye

    Reply
  54. Karina on

    Can I plant flowers seeds on the top of fabric?

    Reply
    • Team Floret on

      Hi Karina,
      You’ll want to burn holes in the fabric and plant the seeds into the dirt. The roots of the flowers won’t grow through the fabric, so planting them into the dirt is best.

  55. Micah on

    Are the holes in your dahlia spacer jig also 2.5”? They look larger, but I can’t tell. Thank you for all the amazing info.

    Reply
    • Team Floret on

      Hi Micah,
      Yes, they are the 2.5″

  56. Vicky on

    Hi such a useful article , what diameter are the holes that you burn ?

    Reply
    • Team Floret on

      Hi Vicky,
      The holes are 2.5 inches in diameter.

  57. Sarah on

    Thank you for the great article! What size of holes do you recommend? Would 1″ holes do the trick?

    Reply
    • Team Floret on

      Hi Sarah,
      The holes we burn are 2.5 inches in diameter. That size seems to work best for us.

  58. Nicolette on

    Thank you for an incredibly informative post. Do you ever grow seeds directly in the holes or only put in seedlings?

    Reply
    • Team Floret on

      Hi Nicolette,
      So glad you enjoyed the post. Sometimes we do directly plant into the landscape fabric, but most often to extend our season, we start our seeds in the greenhouse first. Thanks for asking!

  59. Meg on

    Thank you so much! We put up our high tunnel, 30×72 two years ago. Oh my! I grew so many weeds. It was awful. I’ve been gardening for so long and that was horrendous to keep up with. I just ordered my Landscape fabric after reading this post. I blog too, and your blog was very clear and informative, unlike so many. Thank you!

    Reply
  60. hynessightgroup on

    This was so, so helpful! I had the wrong idea of your burning method for your holes in my mind and your article explained it perfectly. The size and weight info was very helpful also. I appreciate your timely response and have an idea of my own that I will pass along to you if it works out in regards to burning the holes. Again, thank you so very much! Doug & Brenda Hynes

    Reply
  61. Geosynthetic Systems on

    This article easy to understand and help to stop weed very effectively. I really follow your idea. Your image gallery is so nice. Thanks for this content.

    Reply
  62. K Scott on

    Have you ever had the need to clean the fabric due to pests or other problems? Any recommendations on doing so?

    Reply
  63. 5 Flowers to Sow and Grow Now – My Blog on

    […] and all chance of frost has passed, we transplant the flowers into our field beds that have heavy landscape fabric weed barrier  and irrigation (underneath the fabric) in […]

    Reply
  64. Carol Whitman on

    I’m interested in a cutting garden for household use, and will adapt a lot of this information! Thank you. We have isolated spots that get good sun in the summer, some of them invaded with comfrey. I’m hoping that by digging up the roots as much as possible (always miss little pieces, right?), and then using landscape cloth, I’ll suppress the stuff. Right now I’ve got old carpet and random pieces of plywood over them. Not lovely, and will see how effective it is.

    Just ordered your book through our local indie bookstore. Should be here next week. Yum.

    Reply
  65. Michael Klug on

    Farmer’s Friend, LLC, has started selling ground cover with mechanically preburned holes. Right now they are only offering two patterns but they are prototyping a machine that can be programmed to make any pattern.

    Best,
    Michael Klug
    notillveggarden.com

    Reply
  66. Tina G on

    Tracy, What a great idea to double up thee fabric when burning the holes! Thank you for sharing!
    Regards, Tina

    Reply
  67. Jessica Zeiger on

    Looks like Farmer’s Friend is going to be offering precut landscape fabric very soon!

    Reply
  68. Anna McCall on

    Flowers and faces

    Thank you so much for valuable information. I have a small business and I do grow a large amount of cut flowers. Your book has made such a difference in how I garden. Sincerely Anna McCall

    Reply
  69. Ashley Howard on

    Floret, do you use the landscape fabric for your Dahlias?

    Reply
  70. Mimi Kezer on

    Outstanding information. Thank you so much for sharing your wealth of knowledge!

    Reply
  71. Mike - Bluebell Cottage Farm on

    I just want to say that I appreciate this blog entry, with all the clear pics and descriptions. I’ve amended the soil, rototilled it, got the sheet metal templates and cut it, got the landscape fabric for burning the holes and have seed on the go. This information has been invaluable and I look forward to purchasing the book soon.

    Reply
  72. Lisa Hammond on

    Thank you so much for posting this article! A great read!

    Reply
  73. Lisa Hammond on

    Thank you so much for posting this article. A great read!

    Reply
  74. Diana on

    Thank you for posting this article! I was in the middle of laying down my landscape fabric when my staples and irrigation supplies arrived in the mail. I was trying to get as much done as I could because the temps were going to drop from 65 to 33 degrees by late evening. Typical Ohio weather nowadays! Anyway in the rush of having only a couple of hours left to work, I almost uncovered the beds to put the irrigation tape down, but then realized I hadn’t bought my weeding torch yet and needed to burn the holes first (and of course, not in the hose too). The tape would have to wait.
    The dreaded feeling of measuring all those hoses came to mind and the thought of how long that would take. So thank you! I jumped up and down when I saw your template and I also have a small torch! What a time saver!

    Reply
  75. Chris on

    Love this post! How do you manually weed once the landscape fabric is down? Do the weeds poke through, or do you lift the material up and weed underneath it?
    Thanks so much! Chris Barnett

    Reply
  76. Tobey on

    Be sure to get landscape fabric with finished edges. Somehow in my garden past I got some wother unfinished edges and I still find the unravelled strands when I dig! Grr!

    Reply
  77. Hayley on

    Do you use 2.5″ holes for all grid spacing? Or larger holes for the larger grid spacing? Thanks!

    Reply
  78. Diane Young on

    Jenna, it is seldom that I am in such admiration of someone who strikes out there to accomplish this type of goal, but girl, I’ve got to hand it to you, you and your team have did a fabulous job. I wish you the very best in all your blooming endeavors. It looks like a thriving business!!!! I LOVE gardening, and plan to try some of your suggestions.

    Reply
  79. Becky K on

    Thank you for sharing! Looking forward to trying this with flowers and our vegetable garden.

    Reply
  80. Jenna Fuge on

    Do you use something to kill the weeds as well such as a natural weed killer?

    Reply
    • Susan King on

      Hi Jenna, thanks for your question. No other products are used to kill weeds, as the landscape fabric does most of the work for us. Going through and manually weeding one or two times early in the season is usually all that is needed, then the flowers are mature enough to shade out weeds. – Team Floret

  81. Wayne Beal on

    I believe I saw where you gave a list of which flower varieties get which spacing. Could you share this.

    Reply
  82. Amber on

    Hi! I love reading through your posts. I live in a really cold climate and want to try this landscape fabric in hopes that it will warm up my soil a little. I’m wondering if it will still work if I don’t have a dripper system?

    Reply
  83. Natalie Jones on

    How do you hold up the the flower netting? Simple bamboo stakes?

    Reply
  84. Clarisse Wilton on

    Thank you for sharing all of your hard earned knowledge!!! I am just soaking it in and dreaming big dreams , got babies at home so it will have to be slow and simple for now. Just came across your blog and just love everything about it!?

    Reply
  85. Megan on

    Hi Dave,
    Have you tired to use the same plastic a second year?

    Reply
  86. David on

    We use Punch N Plant Weed block which is a newer? product I found online which has the holes pre-perforated in landscape fabric where you can choose which ones to punch out and use. It worked great for us this year. I contacted them and they can do larger rolls than the ones they sell in stores as well.

    Reply
  87. Clara on

    Do you ever have problems with rodents chewing through your drip tape and struggling to fix it through the fabric? If so, any solutions? for either rodents under the fabric or having to fix drip tape holes.

    Reply
    • Tara on

      I’m wondering how you fix the drip lines if they ever blow out or get clogged. I imagine it would be difficult while they are under the fabric.

  88. Tracey Matchett on

    Success!! We doubled our 28 metre lengths of Landscape Fabric ,and then used our homemade metal Template / Burner ,to burn Two Holes at a time. We then pulled apart and wham a single legnth ready to go down on Drip Tape. Thankyou Floret for All your help.

    Reply
  89. Melissa Brauneis on

    Erin, with the length of your rows, you said I think 70 feet, how do you work the length of these at 300 feet. Do you cut the mats at the desired length to cover your 70 foot rows, I assume a bit extra at each end? I can’t see you not cutting them to fit you plots, but I thought I’d ask.

    Thanks about showing how easy it can be to burn the pattern into the cover.

    Reply
  90. Trasa Roth on

    Thank you for sharing this. Will definitely give it a try when we have our own farm. So helpful!

    Reply
  91. Julie on

    Hi Erin, I just discovered you and floret Floret flowers. Thankyou for all of the inspiring advice you provide. I am an aspiring and budding farmer of flowers, but specifically peonies. My collection is growing and maturing. I know you mention them in your posts, pictures, and bouquets. If you’d be willing to share a little info on how you lay out you beds, landscape fabric, etc, I would love to hear.
    Thankyou for all the information you share!

    Reply
  92. Mia on

    Great post! I second the questions about dahlias and gophers. Would love to be weed-free in my u pick!

    Reply
  93. Tammy on

    Just burned our first holes today and they turned out great! Thanks for the detailed instructions.

    Reply
  94. Stacey Cross on

    Husband just finished burning the weed fabric and it turned out beautifully. He made a template with plywood that worked fine. The landscape fabric burned without doing any damage to the plywood. Laying the drip lines and tagging down next week. Thank you so much for your amazing posts. We very nearly copied your ideas with the 9 ” spacing and it has turned out very nearly perfect. THANK YOU ERIN!!

    Reply
  95. Amber on

    Really! this sounds like a miracle product even for my small home veggie and flower garden! I’m definitely trying it this year. Thanks for the resources to purchase and your recommended spacing. Very useful.

    Reply
  96. Janie on

    Dear Erin,
    I am just starting out and feel so overwhelmed at times; however, your blog posts serve to calm the anxiety with step by step, very concrete actions to take. Thank you for the enormous amount of time you’ve put into this. I appreciate every word and photo!

    Reply
  97. Shyla on

    Question – So how about if you are using the landscape fabric in your garden to plant pre-started plants in. Do you do the same procedure but dig a hole for the plant in the burnt opening?

    Reply
  98. Jana on

    Dear Erin, I have two question, not concerning previous issues, but the february Blog Blizzard may end up soon, so I rather try it now :)
    I am interested, how does seed collecting work. How close can be cultivars of same flower to keep their characteristic and not to mingle together? I would like to keep seeds from this season crop for the next one…what should I do or avoid?
    Direct sowing – how does it actually works?How do you do it?When direct sowing, should I transplant the seedlings then to proper spacing or use only thinnig them up?
    Thank you very much for your sharing, it is so helpfull! Best regards from Czech republic

    Reply
  99. Jillian on

    Hi Erin!

    Thank you so much for sharing this flurry of information, what a gift to give the knowledge that was so difficult (and expensive) to attain yourself! I’m having a lot of trouble finding Sunbelt fabric out here in NH and hope that Johnny’s would be my answer, but they don’t carry it either! There’s a Dewitt brand called Pro 5 that they carry, but it doesn’t appear to be as smooth as that which you have pictured.

    Help?!

    Reply
    • Sherry on

      We were able to find the DeWitt Sunbelt 6’x300′ shipped direct from the manufacturer through the Northern Tool online store.

  100. Lina on

    Again with the awesomeness! Thank you very much for being so clear about what you do and what you’ve figured out. My husband has been a bit against any sort of plastic or landscape fabric on our beds – mostly because we don’t have a tractor to lay down tight plastic and throwing it away every year seems terrible. Doing it by hand and being able to re-use it is huge. And I might be able to convince him now that it involves fire… :)

    Reply
  101. Ali on

    Awesome post! So excited, I’ve got 15 rolls of 6′ x 300′ Sunbelt delivering in two weeks! Can’t believe I ever farmed without.

    Reply
  102. Anja on

    Here the fabric comes with a pattern that suites our spacing well, so we can burn without any template. And the thing we burn with are abour one meter long, so burning holes in the fabric is one of the few jobs we can do with our backs straight. It’s supereasy, almost like having a break :-)
    Thank you Erin, for all that you share, you’re the best!

    Reply
  103. Annette Crawford on

    Thank you, thank you, thank you Erin! This blog has answered all the remaining questions I had about buying and prepping the landscape fabric. My little urban flower farm will be planted on a much smaller scale starting this year with 12 3′ x 10′ beds but essentially the process is the same. In addition I have several other established beds where I will be planting out the early birds; hardy annuals, anemone, ranunculus and sweet peas and of course my fall planting of spring bulbs. Your advice is golden and I am so looking forward to the growing season ahead!

    Reply
  104. Jillian on

    Such HELPFUL information! Thank you for all the blog posts. I feel like I am drinking from a fire hose, & my “to do” list is growing. I’m thankful for your experienced & detailed advice, it will save me so much time!!! I’ve always wanted to buy a torch! There were a few questions about rodents. I’d like to know, too, what you do to deter them. I use traps, but I still don’t get them all. When I lived in the city (read 7000 sq. ft. lot) & had moles I made a garlic/castor oil/dish soap concoction. I put it in a Blendtec with water & made a nice liquid out of it. I then put it in a garden sprayer that attached to my hose & sprayed it on my lawn & flower beds. I didn’t want to use it on the vegetable garden that we would eat vegetables from. The solution coats the worms & grubs, & the moles don’t like the taste of them, so leave. It worked, & I may try this again; even though I have a bigger space. I would like to know if you use the cloth with dahlias, & also, if you use the fabric with perennials. I’ve been wanting to start a peony patch. I’ve been loving all your posts!

    Reply
  105. Donna on

    Thank you, Erin, for all of this information. I will definitely invest in good-quality landscape fabric. I have used “fabric” in the past, but it always falls apart and is certainly not reusable. Last year, I totally lost the battle with the weeds. Not this year!!!

    Reply
  106. giulia on

    Thanks Erin, very precious information as always!!!!
    I have a question, for wich flowers you DON’T use landscape fabric?

    Reply
  107. Alaina Noel on

    Erin, thank you so much for sharing all of your hard earned wisdom! May I ask why not to use the fabric that is fuzzy on one side?
    Thanks so much ,
    Alaina Noel

    Reply
  108. Nina on

    Hi! Thank you so much for sharing all your hard earned information! The pictures are great and really help me to get a real idea of what I want to do and form the picture in my head! Awesome! A random thought as I looked at all that fabric and how much land it covered; have you ever had any critters (ie. snakes) harass you from beneath the fabric? I know, far out, or maybe not, haha! thanks much again! Best!

    Reply
  109. Mara - The Farm at Oxford on

    Awesome post Erin! I used fabric last year but this year I am going to use it even more and do some areas all fabric (dahlias), just picked up a 300′ roll and may get another. Our PA weeds are CRAZY.

    Question–you said you use the tractor bucket to pull up the fabric at the end of the season, do you pull the staples out with it, do they come out attached to the fabric or do you have to go through by hand? Sometimes our staples don’t come out with the fabric which makes it a manual process. Any tips? Once it’s up do you just work together to fold it or how do you store?

    Reply
  110. Sybil H.Skinne on

    I just want to thank you for your posts. You have answered many questions I have had over the years and I appreciate this greatly. My Dad was a farmer and as a small child I seeded and he always soaked the soil. I had worked on a flower farm in NY and they never did and I always wondered why not – I was delighted to see you suggest it because I always have thought seeds should be moist to germinate – thanks, Sybil

    Reply
  111. Stephanie on

    Awesome! Thank you for sharing!

    Reply
  112. Abby on

    THANK YOU!!!

    Reply
  113. Sherry on

    Thank you so much!!! I just emailed the link to this article to my husband. Now we can begin in earnest to start preparing to plant at the end of March. I like others went looking for this info and couldn’t find it, but I didn’t panic because I knew this would be included in the February blizzard. The added info is incredibly helpful. I went to the county Ag center yesterday and got boxes for soil testing. It’s only $4.00 a sample during there busy months (December-March) of course. But free during the rest of the year. I’m starting late but should get results back within two weeks. Just need to let the ground dry a little from all the rain lately. Getting very excited, love the anticipation of new beginnings!!!

    Reply
  114. Meredith on

    This was super helpful, I’ve started gathering my supplies and I’ll be giving this a shot in my backyard gardens this year. Erin, thank you so much for these posts, they are so generous! I would also love to hear more about what you recommend for drip irrigation. Your insight is wonderful!

    Reply
  115. Kathy on

    Wow! Thank you soooooo much. Looking into this now. We are always so innundated with weeds here in Georgia. Really looking forward to this information about the “tea”. As always, I am so thankful for all the details you so freely shower upon us. Thank you doesn’t seem to cover how I really feel, but it’s all I have.

    Reply
  116. Jessica on

    Thank you so much for sharing all of this. Your blog posts have been SUCH a help..<3

    Reply
  117. Prince snow farm on

    I will need this probably next year. After you said you couldn’t find one with holes, I started searching. I did Find something called a garden mat with premade holes. They also sell commercial sized rolls. I’m going to look into it! http://gardenmats.com. Thanks again for sharing all of this info! I included a list of the seeds I’m buying from you in my latest blog post!!

    Reply
  118. Tania Cubberly on

    Erin!
    Awesome thank you for this. Could you tell us also is this a 3.2 oz fabric or 4.1 oz. ? Thanks!!

    Reply
  119. Audrey on

    This is super helpful! I’d love, love, love to see a post on disease and pest control.

    Reply
  120. Helen on

    Fantastic! Love the sheet metal template. I’ve seen others use a flame weeder, which is probably what I’ll do this year – you just set it right down onto the fabric and it cuts through. Some folks do the burning right on top of the soil with the fabric already pinned down. FYI, I bought some of the Pro-5 fabric from Johnny’s and had to return it because it was the fuzzy kind! It cost a lot to return, so call and make sure before you buy. Thanks Erin & team!

    Reply
  121. Kathy on

    Thank you so much for all the details. That’s exactly what I’ve been needing!

    Reply
  122. Stacey C. on

    Thank you Erin. Loving this blog blizzard!! Showed the template to burn the fabric to the hubby and he is on it!! Happen to have the fabric just needed the extra insight. Thank you so much.

    Reply
  123. Ali on

    Thanks so much for this amazing post Erin! Two questions, what are the lines drawn on the fabric for, and do your irrigation lines go in-between the burned holes in the fabric? Looking forward to trying out this method this year! You are seriously getting me pummped for the spring!

    Reply
  124. Chas B. on

    I really liked this post. Any help keeping weeds in check is so helpful. I especially liked the template making directions to burn holes in fabric. As always thank you for the lovely post, this one will make life easier this year!!! ???

    Reply
  125. Susan on

    Sure wish I had known about burning the holes when I was growing Lavender. Not only did we cut ours, which caused it to fray, I purchased 6 foot wide rolls (all I could find at the time) and cut it in to 2 foot widths so the edges were frayed as well. We have a terrible time with moles and they wreaked havoc on the landscape fabric and the worst part is that the birds picked up the frayed threads and used them for their nests. We have found tiny babies dead in their nests because they were caught in the threads and have rescued a couple on the ground who couldn’t fly as their legs were wrapped by the plastic threads. Needless to say all of the landscape fabric is rolled up and inside our barn where the birds can’t have access to it. By all means spend the money to buy the “hole burner” (It works for weeds too when used on gravel or hardscape). Although that being said about using it for burning weeds, someone in England set his neighbors yard and gardens on fire using the “burning” method for killing weeds. Oops!

    Reply
  126. Anneke Huyzers on

    Wow! Thank so much for sharing. I really appreciate your valuable information. I am based in South Africa and used these sheets with great success during spring and early summer. I find that when it gets too hot ( we had an extremely hot summer 38 – 41degreesC) it attracts too much heat – even under shade cloth. I used your idea for hoop houses and covered it with 40% shade cloth for the extreme summer periods. So far so good. Will keep you posted. Keep up the good work. I love being part of this flower community!

    Reply
  127. Elisabeth Ontario on

    Another great post! I’m glad you included pictures of the grid. I’m doing this for my garden this year and I don’t think my husband quite understood how I explained it to him, so it’s easy peasy for me to show him this blog post. It’s funny how I explain things to him…. “Erin does this” and “Erin does that”. The people at my local garden supply store hadn’t heard of burning the holes either…..thanks!

    Reply
    • Heather on

      Lol! I just did this with my husband 5 minutes ago. I talk of Erin as if she and I hang out each day.

  128. Line i Alvehagen on

    I really love these posts, Erin. So full of valuable information. Do you use fabric on your perennial plantings aswell? What about biennials? I’m a bit concerned about making hiding places for mice and voles… Are there any annuals you don’t plant in fabric? If so, for what reason? And a different thing; the low tunnels on the top pic, how do you stop them from blowing away? Just spent a late night pinning down fabric with blocks and pallets… Thanks for sharing, it is much appreciated!

    Reply
  129. Lynn on

    Yay!! Another extremely timely post!! This information is invaluable and the best part to me is you including your brands that you use and where to get them!!! Thank you for your generosity and all the work and thought that goes into these posts. PLEASE keep them coming. Maybe one on watering? Especially on the drip irrigation, where you get your supplies, what you use, how often you turn it on, how long you leave it on, how you make your compost tea, how frequently your spray it.

    Reply
    • Heather on

      I second this statement! :-)
      Thank you for all you share with us!
      Much love from East TN. Oxoo!

  130. Jane on

    Thank you again. Following your instructions from previous posts got me using lanscape fabric for most of my flowers last year, which was my first. Thank goodness. The sheet metal template with the wire pull will be this year’s addition, as well as more than 9×9 spacing. Hopefully I’ll get the whole thing (almost) covered. The information you give so freely to all of us is invaluable. I get so excited and happy reading it all. Thank you.

    Reply
  131. Julio on

    I dont know how much time I spent over the last week trying to find your post on Landscape Fabric, so thank you SO MUCH for this updated version!
    Do you use fabric for dahlias, or are they big enough that the weeds are quite a competition?

    Thanks Erin!

    Reply
    • Julio on

      I meant ” Do you use fabric for dahlias, or are they big enough that the weeds AREN’T quite a competition?”

    • Brittany G. on

      I want to know the answer to this too!

  132. Liesbeth roos on

    Thank you , very interesting and inspiring!

    I hav read “compost tea” a couple kf times now in your posts. Are you going to focus on that soon?

    Reply
  133. Hedda Brorstrom on

    Do you have gophers? I am so hesitant to use this because it would be hard to trap. Perhaps I’ll invest in a small amount and use on plants I know they don’t love.

    Reply
  134. Ashley Rose on

    Such a lovely article! I cannot wait to tackle this project, (on a smaller scale), hopefully this weekend! Thank you for your thoughtful post, detailed outline, and genuine love of flowers. Your blog is the sweetest gift!

    Reply
  135. Killoran on

    I won’t be getting an this year – not enough space to justify the cost – but this is a great resource! And it reminded me I do need netting because wind.

    Reply
  136. marybeth on

    As always such great info! Thanks so much for sharing your expertise, time, and energy. I’m relatively new to your blog so I can go back and read your previous posts as my nighttime reading….and drift off to sleep with dreams of all the beautiful blooms to appear on our little half acre farm. ???

    Reply
  137. James on

    Sublime, just so simple and yet so easy to recreate.

    I can see I have my work cut out for me in the next few weeks, goodness so much to learn and it feels that the clock is already ticking down!

    Thanks for sharing….I know we were all waiting for this!

    Reply
  138. Jenny Rae on

    I near panicked when I couldn’t find your blog post about burning landscape fabric a couple weeks ago! Thanks so much for putting it back up. I feel so daunted by it having never used it before but the idea of wedding again like last year is my worst nightmare. Time to take the plunge. Do you use the landscape fabric for dahlias? Thanks a bajillion for sharing!

    Reply
  139. linds6560880 on

    Wow, thank you for this. Weeds are always the end to my spring time excitement. Are there some things you grow without this fabric because they do better for some reason?

    Another question I am hoping you answer in this series (which I am loving) is how you handle perennials. Do you rip them out and treat them as annuals. And which ones are your favorite if we plan to keep them from season to season? Thank you!

    Reply
  140. Grace on

    I have been looking at this product for the past few years wondering if it was really worth it I know the weed fabrics are a joke and I’ve tried plastic but it doesn’t last and it doesn’t allow water to go through so last year I tore it all up and I am going to invest the money into this stuff!! Thanks for reaffirming my research!!

    Grace e

    Reply
  141. Erin @ Red Maple Flowers on

    We use a plywood template and a weed burner with a 2″ nozzle for most of our planting holes. Any that we need bigger than that we use a blowtorch like you do, attached to a big-ol can of propane that we lug around. You’d think the plywood would get burned, but it doesn’t really. Thanks for your work and recommendation of landscape fabric. It’s saved us tons of work at the outset.

    Reply

Leave a Comment

Floret Farm's Small Plot: Big Impact

Small Plot: Big Impact

Inspiring stories, profiles & advice from 45 flower growers from around the world

Stay in the loop with our updates

Close

Join Us

Join the Floret newsletter and stay in the loop on all the exciting happenings here on the farm

Close